
Bard's Lesson
Tutorial - Cutout Animation
Intro
Cutout animation is a very productive technique of animation which even allows you to, if you want and have the guts, procedural generate animations, since they use ingame properties. This is even powerful when we are talking about Godot's Animation System. which allows us to animate nearly any and every property of a Node and even make function calls.
What will we need?
A spritesheet
Well...to start with we will need to setup our spritesheet. For cutout animations, spritesheets are different than the ones used for pixelart frame-by-frame animations. Instead of rendering the frames of our animation to an image file, we will cut and separate the animable pieces of our characters. A small tip here is to create some kind of pattern, in which you can rely on for new characters, I'll explain more about that later.
For Rowan, the main character of Bard's Lesson, this is the spritesheet I set up using Inkscape:
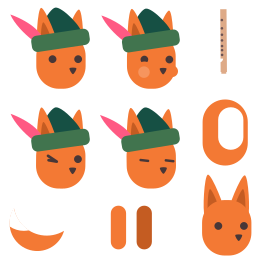
You can see that there are many expressions for the face, this is because it is easier to set these expressions inside your preferred drawing software than to break up the face into small pieces and animate them independently. You can open and tweak the editable .svg file within the Creator's Bundle, it's the main_character.svg file.
A setup scene
The next step is to use this spritesheet to create a setup scene where the animations will be done. In the current iteration of Bard's Lesson I didn't go from that approach, but in the current project, No Diet for Good Pigs (release April's 5th), I learned that it is way better to create a dedicated scene for the graphics wise part of the character. So I setup the scene as it goes:

This way everything related to the animation of the sprites of the character would be self contained in a simple scene which could be instantiated in the final character scene later. This provides excellent advantages:
- If you have an artist on your team, or if you are the artist, it will be easier to point where they should work and they job won't step onto yours
- If you work with version control, will be easier to track animation updates, changes, additions, removals, etc...
- Will be also easier to make issues, assigning the artist or artists teams, and pointing to the scene that should change
- When they pull request their changes, will be easier to read the .tscn file while reviewing
And many other advantages, but the best one I'll show at the end of this topic.
Setting up the sprites
After breaking down the character in animable objects using the Sprite node is time to map what each sprite should render, and to do it we will turn on the Region Rect property and set the area in the texture that shall be rendered by this Sprite by opening the Texture Region tab. If this tab doesn't show up for you, don't panic, Godot has contextual interface, so if this isn't showing up, you probably isn't with the Sprite node selected.

From the Texture Region tab is just a matter of setting the desired area for each Sprite and distribute your sprites in the scene assembling your character. A small tip that I can suggest is to turn on the the Pixel Snap and to also give some extra space when drawing the region rect, specially if you're using some kind of filter for your sprite.

Rest Pose
After distributing the sprites to build up the character, I highly recommend you to create a rest pose, an animation which you can rely on to reset every parameter you used in your other animations, so that the character can always be at its natural pose.
To do this, simply create an animation in the AnimationPlayer responsible for the animations of your cutout character and start inserting keyframes for every relevant property. This can goes from the rotation of each sprite, to the region_rect of the character's face.

From there, we can set a small blending time on AnimationPlayer so that we can be sure the character won't just "blink" through an animation to another. A blending time is an interpolation time which the AnimationPlayer should interpolate the tracks's keys from the last animation to the newest one, making sure they will blend from one to another.

Animations as Resources
Now this is the best part of this approach. Godot Engine can save Animations as resources. What does it mean? It means you can use them between projects, since a .tres file will be saved on disk apart from the .tscn.

For instance with very small tweaks in the jump and the fall animations used in Bard's Lesson I was able to reuse them in the No Diets for Good Pigs, now imagine a complete repository which you can rely on to reuse animations, for instance a walking animation, or a combo? Well that's what I'm doing!
Pigdev's Cutout Animation Repository
I'm creating a repository for this purpose, currently there's only Rowan, the fox, there but as soon as I finish the current game I'll update it, you can check it out at the official repository. Also, if you already use Godot Engine, I just uploaded a request to insert this repo on the the Godot Asset Store(also acessible from within the engine's editor), by the time you're reading this it should be available already! Use it without moderation lol
That's it, keep developing and until the next time!
Comments
Log in with itch.io to leave a comment.
Thanks! This was a very helpful tutorial! I've been trying to figure out how to set these regions with the GUI for days... I'm so glad I saw the Texture Region panel now.
Also, another handy feature I just noticed (which is very helpful for this particular workflow) is bulk edit in the scene node-tree panel. You can just select all nodes, then drag the sprite sheet PNG over from the resource panel into the Texture property dropdown.
Yeah!, Also note that you can use the "Autoslice" on the Texture Region tab so Godot identifies the pieces of your texture and lets you select which piece shall be assigned to the selected Sprite node, very convenient!
Woah, nice! Thanks, that's super useful!
Thank you so much for sharing this information with us
The pleasure is mine <3